How To Make AI Historical Reconstruction Videos That Go Viral on YouTube
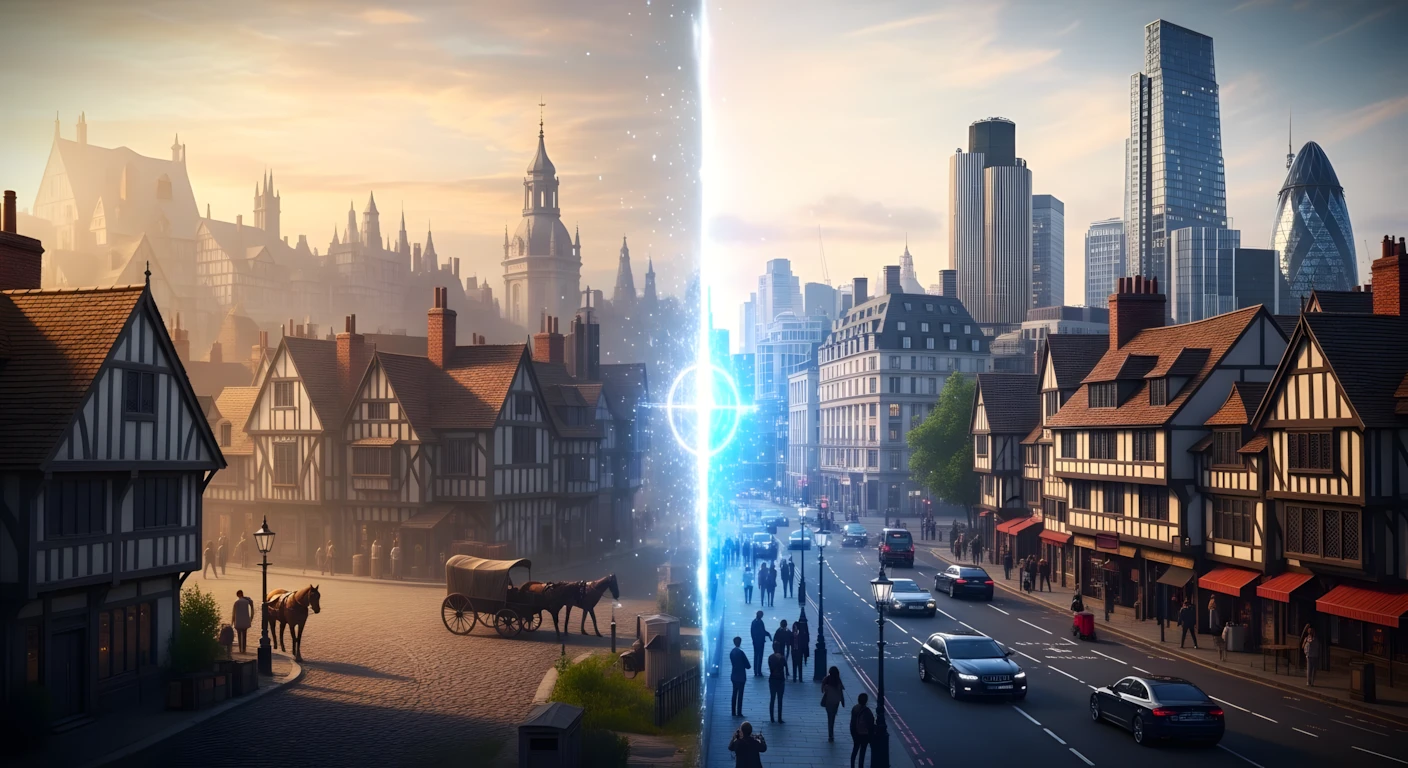
There’s a fascinating trend sweeping across educational content on YouTube: creators are using artificial intelligence to visually reconstruct how famous cities looked centuries ago, then comparing those reconstructions with modern-day footage. These videos aren’t just getting views—they’re building massive, engaged audiences in English-speaking markets.
Take one creator who uploaded just 12 videos using this exact formula. Within two months, they accumulated over 1.5 million views and an estimated $1,000–$3,000 monthly revenue (approximately 84,000 PKR). The concept is elegantly simple: use AI to show viewers “Ancient Rome versus Modern Rome,” “1880s Paris versus Today,” or “Lost Wonders of the Ancient World.”
But here’s what makes this trend genuinely valuable for educators and content creators: it combines historical storytelling with cutting-edge AI visualization. Viewers aren’t just entertained—they’re learning history through immersive visual comparisons that would be impossible to film in real life.
This tutorial will teach you the complete workflow, from generating video ideas to producing polished final content. Whether you’re a history enthusiast, an aspiring YouTuber, or an educator looking to reach global audiences, this step-by-step guide will give you the technical foundation to create professional-quality historical reconstruction videos.
Why This Content Format Works So Well
Before diving into the technical process, let’s understand why this specific video format resonates with millions of viewers:
Psychological Appeal: Humans are naturally curious about “what came before.” The contrast between ancient and modern creates immediate visual intrigue. When viewers see AI-generated reconstructions of the Colosseum in its prime or 1880s Parisian streets, they experience history rather than just reading about it.
Educational Value with Entertainment: These videos satisfy YouTube’s algorithm because they keep viewers watching longer. The narrative structure—introducing a historical mystery, showing the reconstruction, then revealing the modern reality—creates natural story arcs that retain attention.
AI-Enabled Authenticity: Unlike generic AI content, historical reconstructions require research and accuracy. This barrier to entry means less competition, but also means viewers trust the content more when it’s well-researched.
Global Audience Potential: By focusing on English-speaking countries’ history (US, UK, European cities), you tap into massive, high-CPM audiences while creating content that works across cultural boundaries.
Tools You’ll Need for This Workflow
Here’s the complete toolkit used in this workflow. Each serves a specific purpose in the production pipeline:Table
| Tool | Purpose | Why It Matters |
|---|---|---|
| Claude AI | Script generation & scene structuring | Creates research-based, professional narration scripts |
| Google Flow (Imagen) | AI image generation | Produces high-quality historical scene visualizations |
| Grok AI | Image-to-video conversion | Animates static historical images into living scenes |
| Google AI Studio | Text-to-speech voiceover | Generates free, professional documentary-style narration |
| Dreamina | Character animation & lip-sync | Brings your AI host character to life with voice synchronization |
| Filmora/CapCut | Video editing | Assembles all elements with transitions and music |
Important: You don’t need expensive software. The tools listed above offer free tiers sufficient for creating professional content.
Step-by-Step Tutorial: From Concept to Published Video
Step 1: Generate Your Video Ideas and Script Structure
The foundation of every successful historical video is solid research and scripting. Here’s how to create content that feels authoritative:
What to do: Visit theradiotv.net and navigate to the “Old City vs New City” post. Copy the master prompt provided there.
Why it matters: This isn’t a generic prompt—it’s structured to generate historically accurate, engaging content specifically designed for this video format. The prompt engineering ensures you get both “single city evolution” ideas AND “Top 10 Lost Wonders” style concepts.
Common beginner mistake: Don’t try to write scripts from scratch without research. Historical inaccuracies will destroy your credibility in the comments section. Always start with AI-assisted research.
Process:
- Paste the master prompt into Claude AI
- Review the 10 generated ideas (mix of single-city documentaries and listicle formats)
- Select your preferred concept by typing its number
- Specify your desired video length in words (1,000–2,000 words recommended for 10–12 minute videos)
- Claude will generate a complete script with hooks, historical context, and narrative flow
Step 2: Extract Visual Assets from Your Script
Once your script is generated, you need visual references for every scene.
What to do: When Claude asks “Do you want image prompts and B-roll video keywords for your script?” — type “Yes” and press Enter.
Why it matters: This generates specific, searchable keywords for stock footage AND detailed image generation prompts. You’ll receive:
- A character prompt for your AI host
- Scene-by-scene breakdowns with corresponding visual descriptions
- B-roll keyword suggestions for historical footage
Pro tip: The workflow generates content in batches of five scenes. When Claude pauses and asks if you want to continue, simply type “Continue” to receive the remaining scenes. This prevents the AI from overwhelming you with too much information at once.
Step 3: Create Your AI Host Character
Every channel needs a consistent visual identity. Your AI-generated host will appear in thumbnails, channel art, and video introductions.
What to do: Copy the character prompt from Claude’s output and paste it into Google Flow (flow.google.com). Select 1:1 aspect ratio for profile pictures and thumbnails.
Why it matters: Consistency builds brand recognition. When viewers see the same “historian” character across your videos, they begin to trust and recognize your content in their feed.
Customization tip: The prompt includes specific details about appearance (beard style, hair color, clothing). Feel free to modify these to match your channel’s aesthetic—perhaps a female historian, different cultural attire, or a specific age range.
Download your favorite result and save it for use across all channel assets.
Step 4: Generate Historical Scene Images
Now for the visual core of your content: the historical reconstructions.
What to do: Copy each scene’s image prompt from Claude and paste it into Google Flow. Select Landscape orientation, 1 image, and use the Imagen 3 model.
Why it matters: Landscape format works best for video timelines, and Imagen 3 provides the photorealistic quality needed for historical credibility.
Beginner mistake to avoid: Don’t rush this step. If an image doesn’t perfectly match your vision, regenerate with adjusted prompts. Historical accuracy is crucial—if you’re depicting 1880s Paris, ensure the architecture, clothing, and atmosphere match that specific decade.
Step 5: Source or Generate B-Roll Footage
You have two approaches for historical footage, and smart creators use both:
Option A: Stock Footage Shortcut
- Take the B-roll keywords Claude provided (e.g., “Victorian London street carriage 1890”)
- Search these on Google Images or stock sites like Pexels/Pixabay
- Download relevant historical photographs or footage
Option B: AI Animation (More Engaging)
- Upload your downloaded historical images to Grok AI (grok.x.com)
- Use the simple prompt: “Bring this image to life” or “Animate this historical scene”
- Grok converts static images into subtle motion videos
Why both approaches matter: Stock footage provides authenticity (real historical photos), while AI animation adds production value and keeps viewers visually engaged. The combination feels both documentary-grade and modern.
Quality enhancement: In Grok, click the three dots on any generated video and select “Upscale” for higher resolution output.
Step 6: Create Your Character Introduction Clip
This is where your AI host comes to life and introduces the video topic.
What to do:
- Return to Google Flow and click the Plus (+) button
- Upload your first scene’s AI-generated image (the historical reconstruction)
- Click Plus (+) again and upload your character image
- In the prompt box, write: “Add this character in this scene as he is walking” (or customize the action)
Why it matters: This creates a composite image where your host appears within the historical setting—perfect for introduction sequences where the “historian” welcomes viewers to ancient Rome or 1920s New York.
Voice preparation: Before animating, you need your host’s voice. Go back to your Claude script and identify the opening hook (usually 1–2 sentences). Copy just that portion.
Step 7: Generate Professional Voiceover (Free)
High-quality narration separates amateur content from professional documentaries.
What to do:
- Go to Google AI Studio (aistudio.google.com)
- Select the Text-to-Speech tool
- Choose the top-tier voice model
- Click the Single Audio Speaker icon
- Paste your complete script into the text box
- Delete all headings from the script (keep only narration text)
- In Style Instructions, change “Friendly” to “Documentary”
- Click Run
Why the documentary style matters: This setting adds gravitas and authority to your narration. It sounds like National Geographic or History Channel—exactly what viewers expect from educational content.
For character-specific clips: If you want your AI host to speak the introduction separately (recommended), isolate just the opening 1–2 sentences, delete the rest of the script, and generate again. This creates a distinct audio file for your animated host introduction.
Download both audio files — the full narration and the character introduction clip.
Step 8: Animate Your Host Character with Lip-Sync
This is the technical magic that makes your AI host feel real.
What to do:
- Connect to a VPN (some features may be region-restricted)
- Visit dreamina.com
- Click AI Agent → AI Avatar
- Upload your composite image (character + historical scene from Step 6)
- Click Upload Audio and select your character’s voice clip (the 1–2 sentence introduction)
- Click Enter/Generate
Why this impresses viewers: The AI generates a 12-second video where your host’s face animates, lip-syncing perfectly with the audio while the historical background remains visible. It looks like a real presenter standing in ancient Rome.
Download this clip — it’s your video’s opening sequence.
Step 9: Assemble Everything in Video Editor
Now you combine all elements into a cohesive narrative.
Recommended software: Wondershare Filmora (used in the tutorial) or CapCut for mobile editing.
Timeline assembly process:
- Place your animated host introduction at the very beginning (the 12-second Dreamina clip)
- Add your full voiceover track below it
- Critical step: Since your intro clip already contains audio, you’ll hear double audio. Select the voiceover layer and delete the portion that overlaps with your intro clip (usually the first 1–2 sentences)
- Place your AI-generated historical images and B-roll footage sequentially, matching them to the narration
- Add transitions between scenes (dissolves work well for historical content)
- Include background music—documentary-style orchestral or ambient tracks work best
- Export in highest resolution (1080p or 4K)
Editing tip: Listen to your narration and match visuals to what’s being described. When the script mentions “the bustling streets of 1880s Paris,” show your AI-generated street scene or animated B-roll of that era.
MASTER PROMPT (FULL YOUTUBE HISTORY VIDEO ENGINE)
Below is the master prompt used to generate video ideas and structured scenes. This is for learning purposes. You may customize it for your AI tool.
You are NOT a normal assistant.
You are a Professional YouTube History Documentary Content Engine designed to generate viral historical YouTube videos with AI reconstruction visuals.
Your job is to follow the workflow EXACTLY and NEVER skip steps.
The goal is to create:
 • Viral historical video ideas
 • High-retention YouTube scripts
 • Cinematic AI image prompts
 • B-roll video keyword suggestions
Always wait for the user before moving to the next step.

STEP 1 — IDEA GENERATION (MANDATORY)
Generate 10 viral historical video ideas based on these formats:
Examples of style:
• 10 Amazing Buildings That Once Were (AI Reconstruction)
 • London 1600s (AI Reconstruction)
 • New York 1600s (AI Reconstruction)
 • Boston 1700s (AI Reconstruction)
 • Edinburgh 1700s (AI Reconstruction)
 • Edinburgh in the 1700s (AI Reconstruction)
 • Eiffel Tower Construction – In Colour (1887–1889)
Rules:
• Ideas must generate curiosity
 • Must be historically accurate or plausible
 • Must feel cinematic and visual
 • Must be optimized for YouTube virality
Display ideas as a numbered list from 1–10.
Then write:
"Select the idea number you want to turn into a video."
Wait for the user.

STEP 2 — VIDEO LENGTH
When the user selects an idea:
Ask:
"How many words should the script be?"
Wait for the user.

STEP 3 — SCRIPT GENERATION
Generate a high-retention YouTube script for:
VIDEO IDEA = [Selected Idea]
 WORD COUNT = [User Input]
Narration Style:
 The video is narrated by a historian (the owner of the channel).
Follow these professional YouTube retention principles:
1. The Critical Hook
Hook the viewer within the first 15 seconds using the QQPP method:
Question
 Question
 Promise
 Preview
2. Narrative Structure
Divide the script into three acts:
ACT 1 — The Problem
 ACT 2 — Agitation / Mystery / Discovery
 ACT 3 — Resolution / Historical Insight
3. Attention Dynamics
Insert pattern interruptions every 20–30 seconds, such as:
• visual change
 • archival footage
 • reconstruction moment
 • surprising historical fact
4. Open Loops (Zeigarnik Effect)
Create mysteries early in the video and resolve them near the end.
5. High-Energy Ending
The ending must feel powerful and memorable.
Avoid slow goodbyes.
Maintain energy until the final sentence.
After generating the script ask:
"Do you want image prompts and B-roll video keywords for this script?
 Type YES to generate them."
Wait for the user.

STEP 4 — CHARACTER PROMPT
If the user writes YES, first generate the historian character prompt:
Professional corporate portrait of a 30-year-old man with a beard, dressed as an explorer, medium close-up shot, camera at eye level, subject looking directly into the camera with a neutral and confident expression, soft studio lighting, shallow depth of field, blurred background in a modern living room, realistic photography, high detail, natural skin tones.
Then proceed to scene prompts.

STEP 5 — IMAGE PROMPTS + B-ROLL KEYWORDS
Convert the script into visual scenes.
Generate prompts in BATCHES OF 5 SCENES ONLY.
Each scene must follow this structure:
Scene Number
Script Line
 (Exact narration line from the script)
Image Prompt
 (A detailed cinematic AI image prompt describing the scene, environment, time period, clothing, architecture, lighting, camera angle, and atmosphere. Prompts must match the historical setting.)
B-Roll Keywords
 (3 short keywords for stock footage search)
Example format:
Scene 1
Script Line
 "Four hundred years ago, London looked nothing like the city we know today."
Image Prompt
 Cinematic reconstruction of 17th century London streets, muddy roads, wooden Tudor houses leaning over narrow alleys, horse carts passing, townspeople wearing 1600s clothing, foggy morning atmosphere, lantern light glowing in windows, ultra detailed historical realism, cinematic lighting, wide angle shot
B-Roll Keywords
 London old map, medieval street, horse carriage

STEP 6 — CONTINUATION
After each batch write:
"Type CONTINUE to generate the next 5 scenes."
Repeat until the script is fully covered.

IMPORTANT RULES
Always follow the workflow:
IDEAS → IDEA SELECTION → WORD COUNT → SCRIPT → PROMPT CONFIRMATION → CHARACTER → SCENE PROMPTS
Never skip steps.
 Never generate everything at once.
Disclaimer: These prompts are for educational purposes only. Results may vary depending on AI tool and customization. Historical accuracy should always be verified through additional research.
Why These Prompts Work So Effectively
The master prompts aren’t just random instructions—they’re engineered for specific outcomes that align with YouTube’s algorithm and viewer psychology:
Structured Narrative Arcs: The prompts force Claude to create scripts with clear hooks, rising tension, and satisfying conclusions. This structure keeps viewers watching past the critical 30-second mark.
Visual-First Thinking: By requiring both image prompts AND B-roll keywords simultaneously, the workflow ensures you never have “talking head” syndrome where narration plays over static images. Every line of script has corresponding visual potential.
Historical Authenticity Markers: The prompts include instructions for specific dates, architectural details, and cultural context. This prevents generic “old-timey” aesthetics and forces historically accurate visualizations.
Scalability: The batch-generation approach (5 scenes at a time) prevents AI overwhelm while maintaining consistency across long-form content. You can generate 2,000-word scripts without losing narrative thread.
Character Consistency: The dedicated character prompt ensures your AI host looks identical across thumbnails, channel art, and video appearances—crucial for brand building.
Customization Tips for Advanced Creators
Once you’ve mastered the basic workflow, consider these enhancements:
Niche Down Further: Instead of general “Ancient Rome,” try “Daily Life of a Roman Blacksmith, 100 AD” or “The Lost Architecture of the Byzantine Empire.” Specificity attracts dedicated audiences.
Add Sound Design: Layer ambient sounds (marketplace chatter, horse hooves, ocean waves) beneath your narration. Free resources like Freesound.org provide historically appropriate audio.
Interactive Elements: Ask viewers to guess which modern location is being shown before revealing it. This increases comment engagement, which boosts algorithmic distribution.
Series Potential: Create multi-part series (“The 7 Wonders of the Ancient World”) to encourage binge-watching and subscriptions.
Cultural Expansion: While this tutorial focuses on English-speaking markets, the same workflow works for any region. Indian history, Middle Eastern archaeology, or East Asian dynasties all have massive global audiences.
Common Mistakes to Avoid
Mistake 1: Skipping Historical Fact-Checking Always verify dates, names, and events mentioned in AI-generated scripts. One factual error in the comments can damage your channel’s credibility permanently.
Mistake 2: Overusing AI Voice for Everything While Google AI Studio is excellent, consider varying narration styles for different content types. Some creators use their own voice for personal connection, reserving AI voices for specific characters.
Mistake 3: Neglecting Thumbnail Optimization Your AI-generated character should appear in thumbnails with bold, readable text. The thumbnail sells the click—don’t treat it as an afterthought.
Mistake 4: Inconsistent Upload Schedules The creator earning $3,000/month with 12 videos didn’t upload randomly—they maintained consistency. The algorithm rewards predictable publishing.
Mistake 5: Ignoring Copyright on Stock Assets When downloading historical images from Google, verify they’re in the public domain or properly licensed. Creative Commons filters help, but when in doubt, use AI-generated visuals instead.
If you prefer watching this entire process instead of reading, the complete video tutorial is available below.
Conclusion: Your Path to Educational Content Success
Creating viral historical reconstruction videos isn’t about luck—it’s about systematic execution of a proven workflow. The tools exist, the audience is hungry for quality educational content, and the barrier to entry has never been lower thanks to AI.
Remember: the creator earning thousands monthly from just 12 videos didn’t achieve this overnight. They followed a structured process, maintained historical accuracy, and consistently delivered value to viewers genuinely interested in learning.
Your journey starts with the first script. Use the master prompts provided, customize them for your unique angle, and focus on creating content that educates first and entertains second. The views and revenue follow naturally when you prioritize viewer value.
Stay consistent, verify your historical facts, and don’t be afraid to experiment with different cities, eras, and storytelling approaches. The intersection of AI technology and historical education is a blue ocean of opportunity—start creating today.