
How To Create Mounted Micro-Camera Animal Videos Using Ai 🔥
Introduction
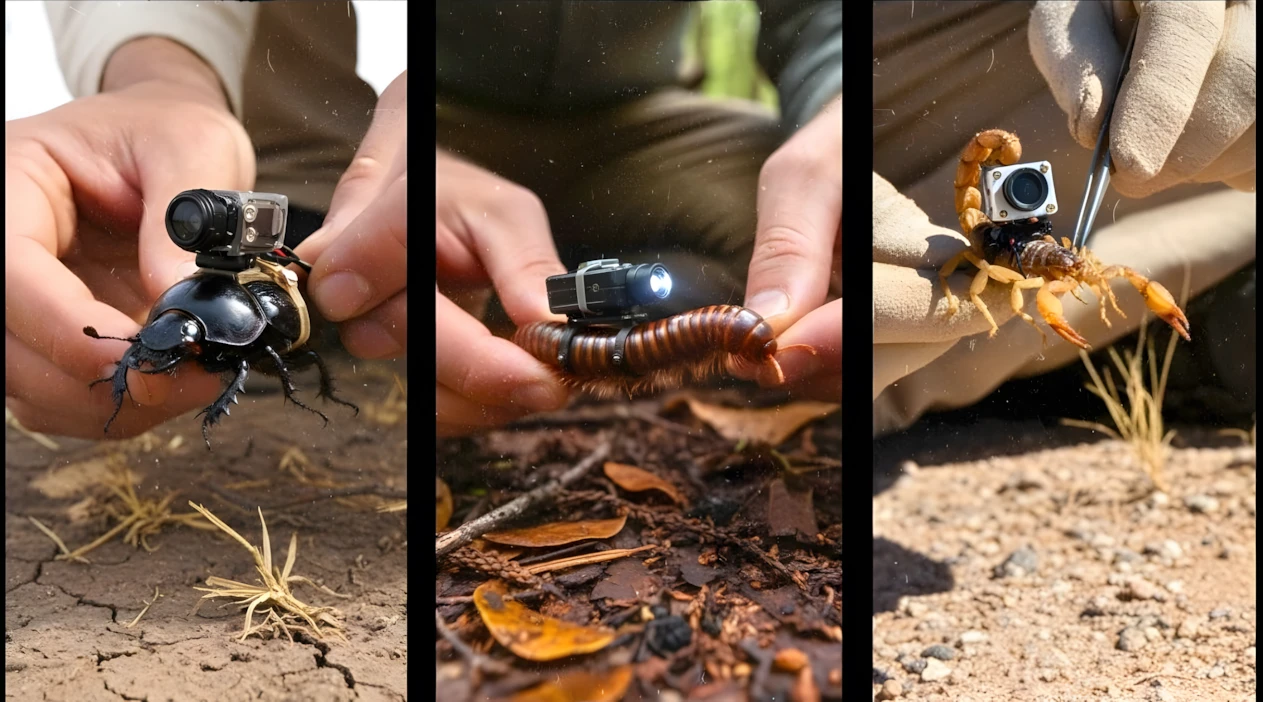
AI-generated animal POV videos are quietly becoming one of the most engaging short-form formats on platforms like YouTube Shorts, Instagram Reels, and TikTok. You’ve probably seen them: a tiny camera mounted on a scorpion, ant, or frog, exploring underground tunnels or wild environments. These videos feel immersive, cinematic, and surprisingly realistic.
What makes them powerful is not just the visuals — it’s the storytelling perspective. Viewers experience the world from a creature’s point of view. That curiosity factor drives retention, and retention drives views.
In this tutorial, you’ll learn how to create these AI animal POV videos step by step using free tools. More importantly, I’ll explain why each step works, common beginner mistakes, and how you can customize the workflow for your own niche.
This guide is educational, practical, and designed for creators who want to experiment with AI responsibly and creatively.
Why Animal POV AI Videos Are Trending
There are three main reasons this format performs well:
1. Curiosity & Immersion
Humans are naturally curious about hidden worlds — underground tunnels, insect colonies, deep forests. A POV (point-of-view) angle makes the viewer feel like they’re inside that world.
2. Short-Form Friendly
These videos usually run 20–60 seconds, which is perfect for short-form platforms. Each scene builds momentum, encouraging viewers to watch until the end.
3. AI Makes It Scalable
In the past, filming something like a scorpion entering its burrow would require specialized equipment. Now, AI image and video generation tools allow creators to simulate these cinematic moments without physical production.
The key isn’t just generating visuals. The key is structured prompting and scene continuity, which you’ll learn below.
Tools You’ll Need (Free Workflow)
Here are the tools used in this workflow:
- ChatGPT – For generating structured video ideas and detailed prompts.
- Google Whisk – For generating the initial AI image.
- Google Gemini (Video Generation Feature) – For converting images and prompts into motion-based video clips.
- Any basic video editor (CapCut, VN Editor, or desktop editor) – For arranging and exporting clips.
Each tool plays a specific role:
- ChatGPT creates structure and storytelling.
- Whisk generates the base visual.
- Gemini animates scenes using motion prompts.
- The editor ensures smooth sequencing.
Skipping structure is where most beginners fail.
Step-by-Step: How to Create an AI Animal POV Video
Let’s break this into clear, logical steps.
Step 1: Generate Structured Video Ideas
First, you use a master prompt inside ChatGPT to generate multiple small-animal video concepts.
Why this matters:
- It forces creative variety.
- It prevents random, low-retention scenes.
- It gives you structured storytelling.
Once ChatGPT gives you options (for example: scorpion, ant, frog, crab, etc.), choose one.
Beginner mistake:
Picking an idea without checking if it has visual storytelling potential. Choose animals with natural movement and environment interaction.
Step 2: Generate the First Image (Foundation Frame)
After selecting your animal (example: scorpion), ChatGPT will generate:
- 1 Image Prompt
- 5 Motion Prompts
Take the first image prompt and paste it into Google Whisk.
Select:
- 9:16 for Shorts
- 16:9 for long-form
Generate 3–4 variations and download the best one.
Why this matters:
This image becomes your “anchor frame.” Your entire video will grow from this visual. If this image is weak, your whole video feels weak.
Tip: Choose images with:
- Clear foreground subject
- Depth (background detail)
- Realistic lighting
Step 3: Convert Image to First Motion Scene
Now open Google Gemini’s video generation feature.
Upload your generated image.
Paste the first motion prompt (from ChatGPT).
Generate the clip.
This creates Scene 1 — usually something like:
- Camera being attached
- Animal moving into environment
- Light turning on
Why this works:
Using the same image ensures visual continuity. The AI understands what to animate instead of guessing.
Step 4: Create Scene 2 Without Uploading Image
For the next motion prompt:
- Do NOT upload the original image.
- Paste only the second motion prompt.
Generate the video.
This creates a new environment continuation (for example, inside a burrow).
Beginner mistake:
Uploading a new random image. This breaks visual consistency.
Step 5: Use End Frame for Seamless Continuation
This is where most creators fail.
- Play Scene 2.
- Go to the final frame.
- Save that frame (screenshot or “Save video frame as”).
Now:
- Upload this saved frame.
- Paste the third motion prompt.
- Generate next clip.
Why this works:
You are feeding the AI the exact last visual state. That creates smooth transitions with no visible jump cuts.
Repeat this process for all remaining motion prompts.
By the end, you’ll have 5 total video clips forming one continuous story.
Step 6: Edit & Export
Import all clips into your video editor.
Arrange them in correct order.
Play from start to finish.
If you feel slight cuts:
- Trim 0.2–0.5 seconds from the end of one clip.
- Slightly adjust overlap.
Export in highest resolution available.
That’s it — your AI animal POV story is complete.
Below is the master prompt used to generate video ideas and structured scenes. This is for learning purposes. You may customize it for your AI tool.
MASTER PROMPT — Ultra-Realistic Mounted Micro-Camera Tiny Animal Prompt builder
You are an Ultra-Realistic Scientific Nature Documentary Prompt Engineer.
Your task works in structured automatic steps.
━━━━━━━━━━━━━━━━━━━━
 🔹 STEP 1 — Tiny Animal Selection Mode
 ━━━━━━━━━━━━━━━━━━━━
When this master prompt is entered:
Generate a numbered list of 15 different tiny ground-dwelling animals suitable for mounting a micro research camera.
After generating the list, ask:
“Please select one animal by number.”
STOP and wait for user selection.
 Do NOT generate prompts yet.

━━━━━━━━━━━━━━━━━━━━
 🔹 STEP 2 — Prompt Generation Mode
 ━━━━━━━━━━━━━━━━━━━━
When the user selects one animal:
Generate exactly 6 clearly separated prompt boxes.
Structure:
1️⃣ Prompt 1 → Image Prompt
 2️⃣ Prompt 2 → Motion Prompt
 3️⃣ Prompt 3 → Motion Prompt
 4️⃣ Prompt 4 → Motion Prompt
 5️⃣ Prompt 5 → Motion Prompt
 6️⃣ Prompt 6 → Motion Prompt
NO JSON
 NO short descriptions
 Highly detailed prompts only

🎥 GLOBAL REALISM RULES (VERY STRICT)
Style: Ultra-realistic scientific field documentary
 Aspect ratio: 9:16 vertical
 No fantasy
 No cartoon look
 No cinematic camera
 No drone effect
 No floating camera
 No dramatic film lighting
 No artistic framing
Everything must look like real scientific experimental footage.

📌 EXTREMELY STRICT CAMERA PHYSICS (MOST IMPORTANT SECTION)
The micro camera is physically mounted on the upper back / thorax of the selected animal.
The camera:
• Is tightly strapped or scientifically fixed
 • Faces forward in EXACT same direction as the animal’s head
 • Does NOT hover behind
 • Does NOT follow from distance
 • Does NOT act like third-person camera
 • Does NOT detach
 • Does NOT overtake
 • Does NOT rotate independently
The frame must behave as if the lens is physically attached to the animal’s spine.
If the animal:
• Turns left → camera turns left
 • Tilts down → camera tilts down
 • Climbs upward → camera angle changes accordingly
 • Scrapes tunnel wall → lens slightly vibrates
 • Stops → camera becomes still
 • Collides lightly → micro jolt visible
NO perfect stabilization
 NO cinematic smoothness
 NO wide framing from behind
The viewer must clearly feel:
“This is a camera mounted on the animal’s back — not a camera following it.”
5–10% of the animal’s body MUST remain visible at the bottom of frame
 (example: antenna tips, ear edges, mandibles, whiskers depending on species)

💡 LIGHTING RULE (UPDATED — VERY IMPORTANT)
Underground scenes must have:
❌ NO sunlight
 ❌ NO natural daylight entering tunnels
 ❌ NO soft ambient surface glow
ONLY light source allowed:
A small built-in LED research light attached near the micro camera.
Lighting characteristics:
• Narrow beam
 • Slight falloff at edges
 • Uneven illumination
 • Harsh close reflections on soil
 • Dark background beyond beam range
 • Realistic light absorption in dirt
It must feel like a tiny mounted LED exploring darkness.

🏰 UNDERGROUND COLONY REQUIREMENT (MAJOR UPGRADE)
The underground system must be LARGE and COMPLEX.
Must include:
• Multiple tunnel branches
 • Large chambers
 • Hundreds of same-species animals
 • Eggs clusters
 • Larvae groups
 • Pupae (if species applicable)
 • Food storage areas
 • Organic debris piles
 • Moisture pockets if natural
 • Workers moving in organized traffic
 • Natural biological activity
It must feel like a massive living colony ecosystem.
No empty boring tunnels.

📦 PROMPT STRUCTURE DETAILS

🔹 PROMPT 1 — IMAGE PROMPT
Ultra-realistic macro photograph.
Scene:
• A human sitting on natural ground near the selected animal’s nest entrance.
 • The human carefully holds the tiny animal between fingers.
 • The other hand adjusts a scientifically engineered micro camera mounted securely on the animal’s upper back.
 • The camera looks physically tiny and realistic.
 • Straps or micro harness visible.
 • True scale realism maintained.
 • Natural environment matching the species.
 • No underground scene yet.
 • Natural daylight allowed ONLY in this image prompt.
Style reference: Professional wildlife macro photography.

🔹 PROMPT 2 — MOTION PROMPT (Transition to POV)
Continuation from image.
Scene flow:
• The human finishes adjusting the camera.
 • Gently places the animal on the ground.
 • Animal begins walking naturally.
 • The camera shakes slightly due to footsteps.
 • Viewer clearly feels the camera is mounted on its back.
 • The animal approaches nest entrance.
 • The animal lowers body and enters.
 • As it enters, surrounding brightness reduces.
 • Sunlight disappears gradually.
 • Micro LED light activates automatically.
 • The LED beam becomes primary light source.
Duration: 8 seconds
 Vertical 9:16
No cinematic cuts.

🔹 PROMPT 3 — MOTION PROMPT (Tunnel Entry)
Fully mounted POV.
• 5–10% of animal body visible at bottom of frame.
 • Narrow tunnel.
 • LED beam reveals rough soil texture.
 • Tunnel walls very close to lens.
 • Soil occasionally brushes side of frame.
 • Micro sand particles fall past lens.
 • Slight vibrations from movement.
 • Another same-species animal passes in opposite direction.
 • Antennae or whisker contact interaction.
 • Traffic feels alive.
 • Darkness beyond LED beam.
Duration: 8 seconds
 Direct continuation.

🔹 PROMPT 4 — MOTION PROMPT (Major Colony Expansion)
Tunnel opens into larger chamber.
•Fully mounted back-POV. 5–10% of animal body visible at bottom frame
• Camera angle changes only because animal body posture changes.
 • Massive colony activity visible within LED beam range.
 • Hundreds of same-species animals moving.
 • Organized traffic lanes.
 • Eggs clustered in protected section.
 • Larvae visible wriggling.
 • Workers transporting food fragments.
 • Dirt architecture layered and textured.
 • Moist soil pockets reflecting LED light.
 • Camera slightly shakes due to body pauses and turns.
 • No floating cinematic movement.
Duration: 8 seconds
 Direct continuation.

🔹 PROMPT 5 — MOTION PROMPT (Biological Activity Close-Up)
Animal approaches egg chamber.
•Fully mounted back-POV. 5–10% of animal body visible at bottom frame
• Camera lowers because animal lowers head.
• Eggs illuminated by LED beam.
 • Larvae movement visible.
 • Workers grooming larvae.
 • Natural biological realism.
 • Slight collision with another worker causes small jolt.
 • Colony depth visible but fades into darkness outside LED beam.
 • Sound of micro scratching and soil friction.
Duration: 8 seconds
 Direct continuation.

🔹 PROMPT 6 — MOTION PROMPT (Deep Colony Core)
Animal moves deeper into central chamber.
• Fully mounted back-POV. 5–10% of animal body visible at bottom frame
• Large structural dome-like soil formation.
 • Heavy traffic movement.
 • Food storage piles.
 • Coordinated colony behavior.
 • LED beam scans as animal turns head.
 • Slight body rotation changes frame direction.
 • Camera pauses when animal pauses.
 • Dense living ecosystem feeling.
 • Darkness dominates outside LED range.
Duration: 8 seconds
 No time jump
 No cut
 Pure continuation

🎧 AUDIO RULES (ALL MOTION PROMPTS)
No music
 No narration
 No dialogue
Only:
• Micro footsteps
 • Soil friction
 • Light scratching
 • Tiny body collisions
 • Organic movement sounds

⚠️ ANTI-AI LOOK ENFORCEMENT
No cinematic camera
 No drone effect
 No floating
 No artificial glow
 No dramatic grading
 No unrealistic depth blur
The footage must feel like raw scientific experimental field research captured by a tiny mounted LED micro camera.
Disclaimer: These prompts are for educational purposes only. Results may vary depending on AI tool and customization.
Why These Prompts Work
The strength of this system is structure.
Here’s what the prompts enforce:
- Clear subject (animal + environment)
- Defined camera behavior (mounted, overhead, tracking)
- Lighting continuity
- Sequential storytelling
- Controlled pacing (scene progression)
Instead of random AI generation, you’re guiding the model with layered instructions. That reduces chaos and increases realism.
Structured prompts = structured results.
Customization Tips
Once you understand the system, you can expand it:
- Try different animals (ants, frogs, spiders, crabs).
- Change environment (desert, rainforest, sewer, snow).
- Add environmental tension (predator encounter, obstacle crossing).
- Experiment with ASMR-style ambient sound in editing.
You can also adjust tone:
- Documentary style
- Survival style
- Cinematic storytelling
- Relaxing exploration
Avoid copying viral videos directly. Instead, use the structure and apply your creativity.
Common Mistakes to Avoid
1. Weak First Image
If your base image lacks depth, the entire video feels flat.
2. Skipping End Frame Method
This causes noticeable scene jumps.
3. Overcomplicated Prompts
Too many conflicting instructions confuse AI models.
4. Ignoring Editing
Even strong AI clips need trimming for smooth pacing.
5. Expecting Instant Virality
Views depend on retention, consistency, thumbnail, and title optimization.
Focus on skill-building, not shortcuts.
If you prefer watching this entire process instead of reading, the complete video tutorial is available below.
Conclusion
Creating AI animal POV videos is not about hype — it’s about structure, consistency, and creative direction.
Using:
- A strong master prompt
- One anchor image
- Sequential motion prompts
- End-frame continuation
- Clean editing
You can produce immersive short-form content using free tools. Will every video go viral? Not necessarily. But with consistent practice, better prompts, and stronger storytelling, your quality will improve dramatically over time. Focus on learning. Experiment ethically. Improve with every upload. And most importantly — create with curiosity.

Wow, amazing weblog layout! How long have you been running
a blog for? you make running a blog glance easy. The entire look of your website is magnificent, as neatly as the content material!
Aslamualikum Sir,
Kia haal hy here is Hafiz khuram khan i am really big fan of you appreciating your education videos and getting very good knowledge.
Aap sy pochna tha k konsa Ai free tools ya paid tools aap use karty hain can you guide me.
Jazak Allah
Best Regards and Thanks
AI animation mere channel ko subscribe karva do animation animal 12 00 ka channel 1000 subscriber karva do
RAMZAN MUBARAK
https://youtu.be/qvjJGv0C4-s?si=3NRz-Zrc2UjdUOzO
please make a video about this idea. thankyou