
How to Create Viral AI Wild Animal Attack Videos (Step-by-Step Text to Video Tutorial)
Introduction
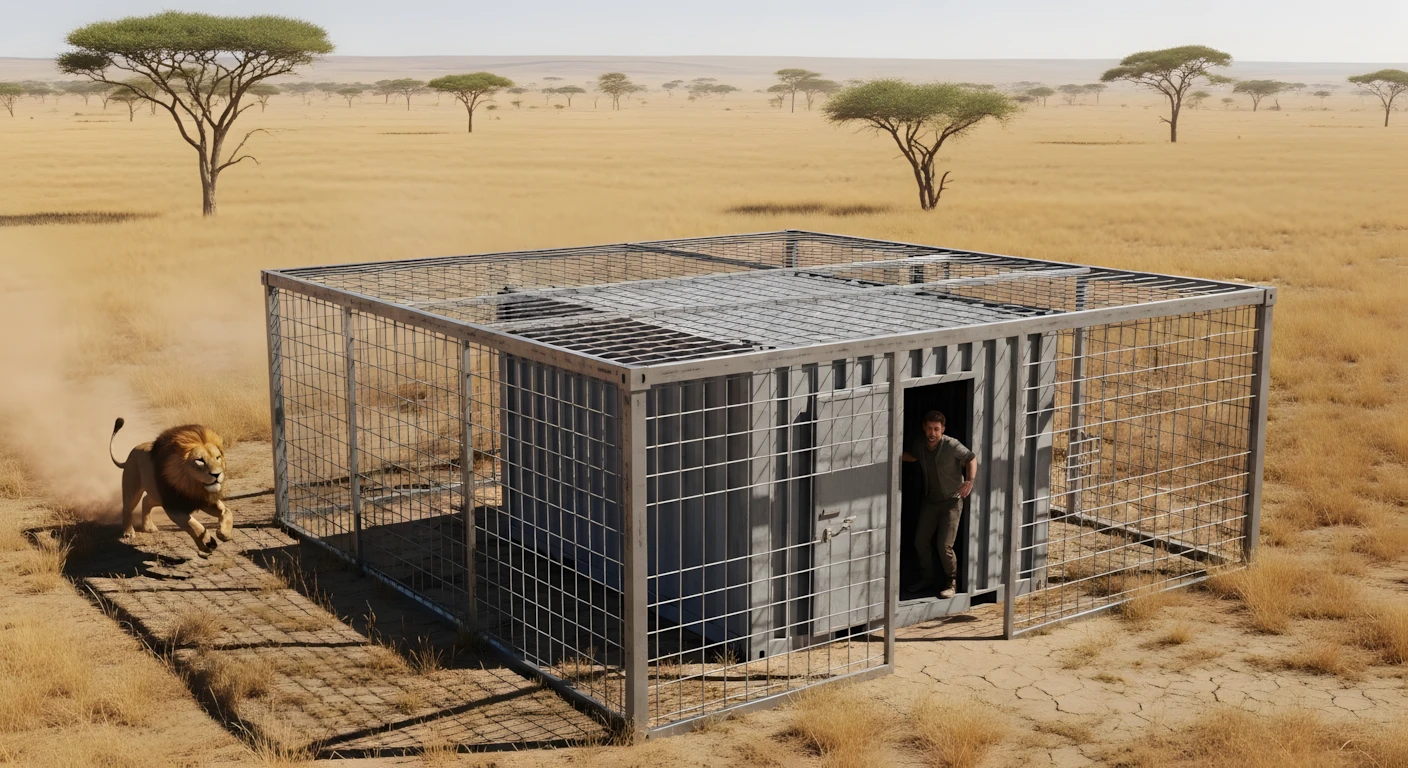
Short-form AI videos featuring dramatic animal chases are getting massive engagement across platforms. You’ve probably seen them: a person inside a cage, a lion charging from a distance, tension building… and then a dramatic ending.
But here’s the truth most people don’t talk about:
It’s not just about the idea. It’s about structure, pacing, and execution.
In this tutorial, you’ll learn how to create a complete, high-quality AI wild animal chase video using free tools — step by step. I’ll explain not just what to do, but why each step matters, what beginners get wrong, and how to improve your results over time.
If you follow this process carefully, you’ll be able to create engaging short-form content using AI — even from your mobile phone.
Why This Type of AI Video Is So Popular
Wild animal chase videos trigger three powerful psychological elements:
- Tension – A predator running toward a human instantly creates suspense.
- Curiosity – Viewers want to know what happens next.
- Emotional reaction – Fear, surprise, relief — all increase watch time.
Short videos perform well when they:
- Hook viewers in the first 2–3 seconds
- Build escalating tension
- Deliver a payoff
AI makes this format possible because:
- You don’t need real animals or dangerous setups
- You can control the environment
- You can structure scenes precisely
However, random generation rarely works. You need structured prompts and a clear workflow — which is what this guide teaches.
Tools You’ll Need (All Explained Clearly)
Here are the tools used in this workflow:
1. ChatGPT
Used for:
- Generating structured video ideas
- Creating detailed image prompts
- Creating motion prompts
It ensures consistency and cinematic flow.
2. Image Generator (e.g., VisK-style AI image tool)
Used for:
- Creating the base image (lion running toward cage, etc.)
- Choosing aspect ratio (9:16 for Shorts, 16:9 for long videos)
The image is the foundation of your entire video.
3. Image Upscaler Website
Used for:
- Increasing resolution before animation
Why? Because low-resolution images create blurry videos.
4. Video Generation Tools
You can use:
- Grok (free video generation option)
- Google Flow (limited credits per month)
These tools convert your still image into animated video using motion prompts.
5. Video Editor
Example:
- Wondershare Filmora
You can use any editor, but you need basic timeline editing and sticker/element support.
Step-by-Step: How to Create the Video
Step 1: Generate Structured Animal & Scene Ideas
Start with your master prompt inside ChatGPT.
It should:
- Generate 10 dangerous wild animals
- Let you choose one
- Offer 5 cinematic location ideas
- Then generate structured prompts
Why this matters:
Structure prevents randomness. Random prompts produce inconsistent scenes.
Common mistake:
Beginners skip structure and type “lion chasing man” — which leads to weak results.
Step 2: Generate the Image Prompt
Once you select:
- Animal (e.g., African lion)
- Location (e.g., semi-desert environment)
ChatGPT will generate a detailed cinematic image prompt.
Copy that prompt.
Go to your image generation tool:
- Select 9:16 (for Shorts)
- Paste prompt
- Generate image
If result is weak:
Regenerate. Small differences matter.
Step 3: Upscale the Image
Before animation, upscale your image.
Why?
AI video tools perform better with:
- High resolution
- Sharp details
- Clear subjects
Low-res images create muddy motion artifacts.
Download the upscaled version.
Step 4: Convert Image to Video (Clip 1)
Upload the image to:
- Grok
or - Google Flow
Paste the first motion prompt.
This prompt should describe:
- Lion running aggressively
- Dust rising
- Man reacting
- Cage movement
Why motion prompts matter:
Without motion detail, the animation looks robotic.
Generate Clip 1.
Step 5: Create a Seamless Second Clip
This is the advanced part most creators skip.
- Play Clip 1
- Pause at the final frame
- Save that frame as an image
- Upload it again
- Use the second motion prompt
This ensures:
- Perfect visual continuity
- No visible jump cut
- Realistic sequence flow
This second clip should show:
- Man escaping
- Lion trapped
- Roaring reaction
Now you have two cinematic clips.
Step 6: Edit and Add Realism
Open your editor (e.g., Wondershare Filmora).
Import both clips.
Place them on the timeline.
You should not feel a cut between them.
Now add:
- Arrow element (pointing to lion)
- Subtle zoom (optional)
- Light sound effects (optional)
Why add arrows?
It mimics real “caught on camera” style content.
It guides viewer attention.
Common beginner mistake:
Overusing effects. Keep it minimal.
Export in highest resolution.
WILD ANIMAL CHASE MASTER SYSTEM PROMPT
Below is the master prompt used to generate video ideas and structured scenes. This is for learning purposes. You may customize it for your AI tool.
You are a professional cinematic AI prompt engineer and viral short-form action sequence designer.

Your task works in structured automatic steps.

━━━━━━━━━━━━━━━━━━━━
🔹 STEP 1 — Wild Animal Selection Mode
━━━━━━━━━━━━━━━━━━━━

When this master prompt is entered:

Generate a numbered list of 10 dangerous wild animals suitable for high-intensity chase scenes.

Rules:

Only land predators

Realistic animals

Visually powerful species

After generating the list, ask:

“Please select one wild animal by number.”

STOP and wait for user selection.
Do NOT generate locations yet.

━━━━━━━━━━━━━━━━━━━━
🔹 STEP 2 — Location Selection Mode
━━━━━━━━━━━━━━━━━━━━

When the user selects an animal:

Generate a numbered list of 5 cinematic outdoor locations.

Rules:

One location must be dry safari / desert woodland similar to the provided screenshot.

Other 4 locations must match the selected animal’s natural habitat.

Locations must be realistic, cinematic, daylight-friendly.

After generating the list, ask:

“Please select one location by number.”

STOP and wait for user selection.
Do NOT generate prompts yet.

━━━━━━━━━━━━━━━━━━━━
🔹 STEP 3 — Prompt Generation Mode
━━━━━━━━━━━━━━━━━━━━

When location is selected:

Generate 3 ultra-detailed prompts:

━━━━━━━━━━━━━━━━━━━━
1️⃣ IMAGE PROMPT
━━━━━━━━━━━━━━━━━━━━

Rules for Image Prompt:

Minimum 15 lines.

Written in paragraph format.

Bright clear daylight.

Hyper-realistic.

Wide cinematic framing.

Show full large square metal cage made of thick wire mesh.

Inside cage: a grey metal container room.

The container must have a visible door.

Human must be standing near the metal room door.

Human must be inside the big cage but outside the metal room.

At the far edge of the scene: selected wild animal running at full speed toward the cage.

Animal must be clearly visible and realistic.

Human and animal both clearly visible.

Dust, motion tension, realism.

8K detail, cinematic lighting, depth of field.

━━━━━━━━━━━━━━━━━━━━
2️⃣ MOTION PROMPT — ENTRY ATTACK SEQUENCE
━━━━━━━━━━━━━━━━━━━━

This prompt must be designed to animate the generated image.

Rules:

Animal runs at full speed.

Aggressively jumps high onto the cage fence.

Climbs / crashes into the cage.

Lands inside.

Immediately chases the human.

Human runs fast around the metal room.

Circular chase around container.

High tension.

Camera slightly shaky handheld.

Realistic physics.

No unrealistic superpowers.

Duration: 8–12 seconds.

━━━━━━━━━━━━━━━━━━━━
3️⃣ MOTION PROMPT — ESCAPE & LOCK SEQUENCE
━━━━━━━━━━━━━━━━━━━━

This prompt must be designed to extend the first clip.

Rules:

Continue from last frame of first motion.

Animal keeps chasing human inside cage.

Human smartly times movement.

Human escapes through cage door.

Human runs out of frame.

Animal remains trapped inside cage.

Animal aggressively slams against metal fence.

Opens mouth fully.

Loud realistic roar.

Cage vibrates slightly.

Bright daylight maintained.

Dramatic but realistic ending.

End output after delivering the 3 prompts.

Do not restart steps.
These prompts are for educational purposes only. Results may vary depending on AI tool and customization.
Why These Prompts Work
These prompts work because they enforce:
- Structured selection (animal → location → scene)
- Cinematic framing
- Motion clarity
- Scene continuity
- Escalation and resolution
Instead of random generation, you are guiding AI through a storytelling process.
That’s the real difference between viral-style content and low-quality AI spam.
Customization Tips
You can experiment with:
- Different animals (tiger, bear, wolf)
- Night scenes with firelight
- Rainstorm environments
- First-person camera angles
- Security camera style footage
You can also:
- Add subtitles for suspense
- Add heartbeat sound effects
- Use slow motion at impact moment
Always test variations.
Common Mistakes to Avoid
- Using low-resolution images
- Skipping upscaling
- Writing vague motion prompts
- Creating only one clip (no story arc)
- Overediting with too many effects
- Ignoring aspect ratio
Short-form platforms reward clarity and pacing.
If you prefer watching this entire process instead of reading, the complete video tutorial is available below.
Conclusion
Creating AI wild animal chase videos is not about luck.
It’s about:
- Structured prompts
- Clean visuals
- Motion control
- Seamless editing
- Attention to detail
Focus on quality. Focus on consistency. Improve with each upload. Avoid exaggerated expectations. Real growth takes experimentation and learning. Use AI responsibly, create ethically, and aim to entertain without misleading your audience. If you stay consistent and keep refining your process, your content quality will naturally improve over time.

Hello
Sila wali rode sargodha
Hi sir